User Permissions
Permissions let you choose what parts of a Merchant Center Project a Team's members can view and edit.
This section covers permissions for Merchant Center users. For API Client permissions, see Authorization and Scopes.
Merchant Center grants permissions based on a user's Team. Teams belong to only one Organization. An Organization can have as many Teams as needed, and a user can belong to more than one team in more than one Organization. You can assign permissions to a Team for multiple Projects in an Organization. If a user belongs to more than one Team, permissions are additive, and they receive all the permissions granted to them by all Teams they belong to.
You can assign the following permissions:
- View permissions: members of the Team can view, but not edit or delete.
- View and edit permissions: members of the Team can view, edit, and delete.
- Action Rights: some permissions have additional action rights, which control specific editing actions in a permission group. Action rights are a subset of view and edit permissions, scoping view and edit permissions to specific aspects of a particular area in the Merchant Center.
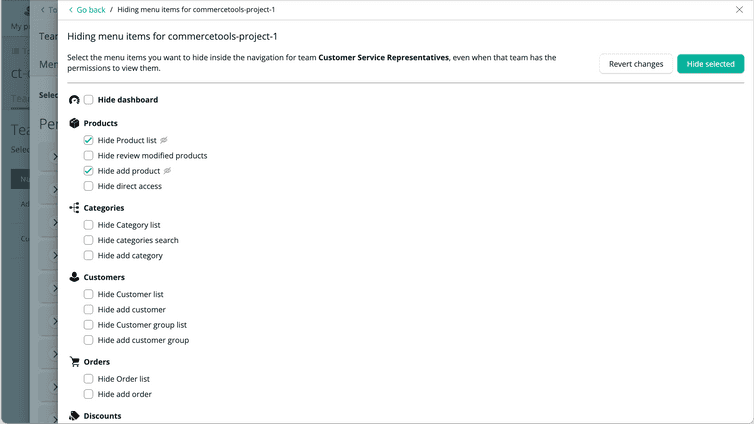
- Menu item permissions: hides navigation items from the main menu.
A Team can have view or edit permissions to a section of the Merchant Center, which is hidden from their menus.
Permissions are assigned to a specific Project in an Organization, and not to all Projects.
View and edit permissions are workflow-based. If users have permissions to access a workflow, the permissions are configured to ensure that all related data relationships needed for the workflow are fulfilled. For example, Orders permission grants access to several APIs such as Customers, Payments, States, Discount Codes, etc.
Conditional permissions
A conditional permission assigns view or view and edit permissions to a subset of data in your Project that meet the requirements specified. The conditions currently supported are assigning permissions by Store.
Administrators Team
Every commercetools Organization has an Administrators Team that can do the following:
- Access to the Account section of the Merchant Center to manage Projects, Organizations, etc.
- Create, modify, or delete a Project
- Create, modify, and delete Teams in the Organization
- Add new members to any Team in the Organization, including the Administrator Team
- Set the permissions for any Team and Project in an Organization
You cannot modify the Administrator Team's permissions. We strongly recommend adding at least one other user to the Administrator Team immediately after creating a new Organization.
Assign permissions and action rights to a Team
To assign permissions and action rights to a Team, do the following:
- Click the profile icon and select Manage Organizations & Teams.
- Select the Organization and Team.
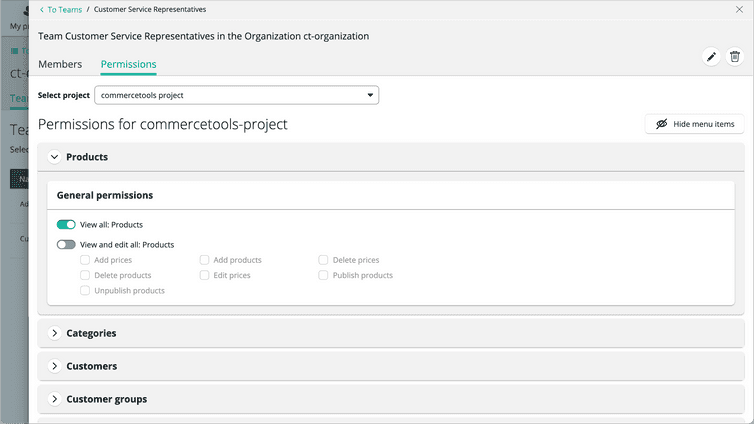
- In the Permissions tab, select a Project (to set permissions for) from the Select Project drop-down.
- Toggle the permissions from the expandable sections. For more information on what each permission grants access to, see Reference: permissions and action rights.

- Optionally, select the action rights for a permission. For more information on what each action right allows a Team to do, see Reference: permissions and action rights.
Permission settings are saved as you edit them.
Assign conditional permissions to a Team
Conditional permissions are only supported on Orders and Customers.
To assign conditional permissions to a Team, do the following:
- Click the profile icon and select Manage Organizations & Teams.
- Select the Organization and Team.
- In the Permissions tab, select a Project (to set permissions for) from the Select Project drop-down.
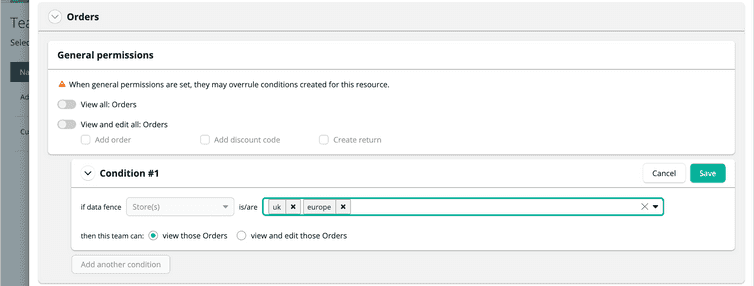
- Select a section (Orders or Customers) and click Add condition.

- In the Condition panel, select the data fence type (only Stores) and values, and the permissions you want to grant within the data fence. For more information on how conditional permissions affect Merchant Center screens, see Reference: permissions and action rights.

- Click Save.
- Optionally, click Add another condition to add more conditional permissions ().
General permissions overwrite conditional permissions. Hence, when setting up a conditional permission, ensure to toggle off its equivalent general permission.
Reference: permissions and action rights
When granting view permissions, the screen and information is shown in read-only mode, and no editing is allowed. When granting view and edit permissions, the screen is shown, and editing of existing information or adding of new information is allowed.
By default, all Merchant Center screens have access to information stored in the Project settings.
Products
View all: Products: activate read-only mode for the following screens:
- Product list
- Direct Product access
- Product details
View and edit all: Products: grant permissions for viewing, editing, and adding Products:
- Product list
- Direct Product access
- Product details
Some functionalities in these screens are dependent on the action rights enabled.
Product action rights
After granting the view and edit permissions, you can grant the following action rights:
Add prices:
- Add new Prices to existing Products.
- Enables the Add price button in Product Variant screens.
- Enables the Add tier price button when creating a new Price.
- Implicitly grants view access to Customer Groups, as they can be used when creating new Prices.
Edit prices:
- Edit existing Prices for a Product.
- Implicitly grants view access Customer Groups, as they can be used when modifying Prices.
Delete prices:
- Delete existing Prices for a Product.
- Enables the delete icon in the Manage the price screen.
Add products:
- Enables the Add Products button in the Product list screen.
- Grants access to all Add Product screens.
- Implicitly grants view access to certain fields in Product Types, Categories, Product Discounts and Customer Group, as they are used when creating new Products.
Delete products:
- Enables the Delete option in the Actions drop-down in the Product list screen.
- Enables the delete icon in the respective Product details screen.
Publish products:
- Enables the Status drop-down in the Product details screen.
- Enables the Publish option in the Actions drop-down in the Product list screen.
Unpublish products:
- Enables the Status drop-down in the Product details screen.
- Enables the Unpublish option in the Actions drop-down in the Product details screen.
Categories
View all: Categories: activate read-only mode for the following screens:
- Categories list
- Category details
- Category search
View and edit all: Categories: grant permissions for viewing, editing, and adding Categories:
- Categories list
- Category details
- Category search
- Add category
Customers
View all: Customers: activate read-only mode for the following screens:
- Customers list
- If granted within a conditional permission, only Customers matching the specified data fence (for example, Customers of "Store A") and global Customers (not bound to any Store) are listed.
- Customer details
- If granted within a conditional permission, only Customers matching the specified data fence (for example, Customers of "Store A") and global Customers (not bound to any Store) can be accessed.
View and edit all: Customers: grant permissions for viewing, editing, and adding Customers:
- Customers list
- If granted within a conditional permission, only Customers matching the specified data fence (for example, Customers of "Store A") and global Customers (not bound to any Store) are listed.
- Customer details
- If granted within a conditional permission, only Customers matching the specified data fence (for example, Customers of "Store A") and global Customers (not bound to any Store) can be accessed. However, global Customers can only be accessed in read-only mode.
- Add customer
- If granted within a conditional permission, the Account restricted to these stores field is mandatory and one or more of the Stores matching the specified data fence must be selected.
Customer Groups
View all: Customer groups: activate read-only mode for the following screens:
- Customer group list
- Customer group details
View and edit all: Customer groups: grant permissions for viewing, editing, and adding Customer Groups:
- Customer group list
- Customer group details
- Add customer group
Orders
View all: Orders: activate read-only mode for the following screens:
- Dashboard
- Orders list
- If granted within a conditional permission, only Orders matching the specified data fence (for example, orders from "Store A") are listed.
- Order details
- If granted within a conditional permission, only Orders matching the specified data fence (for example, orders from "Store A") can be accessed.
View and edit all: Orders: grant permissions for viewing, editing, and adding Orders.
- Dashboard
- Orders list
- If granted within a conditional permission, only Orders matching the specified data fence (for example, orders from "Store A") are listed.
- Order details
- If granted within a conditional permission, only Orders matching the specified data fence (for example, orders from "Store A") can be accessed.
- Add order
- If granted within a conditional permission, a Store matching the specified data fence must be selected at the beginning of the flow.
Granting view and edit permissions to Orders implicitly grants view access to certain fields in Customers, Products (and all dependencies of Products, like Product Discounts), Discount Codes, and Cart Discounts when using the Add order screen.
Some functionalities in these screens are dependent on the action rights enabled.
Order action rights
After granting the view and edit permissions, you can grant the following action rights:
Add order:
- Enables the Add Order button in the Order list screen.
- Enables the Add Order menu item under Orders in the Merchant Center main menu.
- Enables the Copy this Order button in the Order details screen.
- If granted with a conditional permission, the conditional permission will be overruled by general permissions (Order action right).
Add discount code:
- Enables the Apply button in the Applied Cart Discount section of the Shopping cart screen.
- If granted with a conditional permission, the conditional permission will be overruled by general permissions (Order action right).
Create return:
- Enables the Create Return button in the Returns tab of the Order details screen.
- If granted with a conditional permission, the conditional permission will be overruled by general permissions (Order action right).
Product Discounts
View all: Product discounts: activate read-only mode for the following screens:
- Product discounts list
- Product discount details
View and edit all: Product discounts: grant permissions for viewing, editing, and adding Product Discounts:
- Product discounts list
- Product discount details
- Add discount (Product Discount button only)
Granting view and edit permissions to Product Discounts implicitly grants view access to certain fields in Products and Categories when using the Add Product Discount screen.
Cart Discounts
View all: Cart discounts: activate read-only mode for the following screens:
- Cart discounts list
- Cart discount details
View and edit all: Cart discounts: grant permissions for viewing, editing, and adding Cart Discounts:
- Cart discounts list
- Cart discount details
- Add discount (Cart Discount button only)
Granting view and edit permissions to Cart Discounts implicitly grants view access to certain fields in Customers, Customer Groups, Products, and Categories when using the Add Cart Discount screen.
Discount Codes
Discount Codes must be used with a Cart Discount. When granting access to Discount Codes, ensure that the user group has access to Cart Discounts as well.
View all: Discounts codes: activate read-only mode for the following screens:
- Discount code list
- Discount code details
View and edit all: Discounts codes: grant permissions for viewing, editing, and adding Discount Codes:
- Discount code list
- Discount code details
- Add discount (Discount Code button only)
Granting view and edit permissions to Discount Codes implicitly grants view access to certain fields in Cart Discounts when using the Add Discount Code screen.
Audit Log
View all: Audit log: activate read-only mode for the following screen:
- Change history
Operations
View all: Operations: activate read-only mode for the following screen:
- Import logs
Project settings
View all: Project settings: activate read-only mode for the following screen:
- Project settings
View and edit all: Project settings: grant permissions for viewing, editing, and adding Project settings:
- Project settings
For more information on what you can configure using Project settings, see Project Settings.
Product Types
View all: Product types: activate read-only mode for the following screen:
- Product types
View and edit all: Product types: grant permissions for viewing, editing, and adding Product Types:
- Product types
Developer settings
Developer settings controls who can create API Clients. We recommend restricting access to only those who need it.
View all: Developer settings: activate read-only mode for the following screen:
- Developer settings
View and edit all: Developer settings: grant permissions for viewing, editing, and adding developer settings:
- Developer settings
