Getting Started with commercetools
First Steps
First of all you have to sign up for your free trial account.
Signing up is easy and takes seconds to complete.
Our trial gives you full access to the commercetools Platform and APIs for 60 days.
After signing up, you’ll receive an email with a link to complete the creation of your trial account with a password of your choice. You’re then automatically logged in to the Merchant Center.
The Merchant Center is a web app for administration of data and settings that you’ll be using for your commercetools Project. You’ll be able to manage your Products, pricing, and Discounts, Project settings, Teams, and users, and more within the Merchant Center.
Welcome to the Merchant Center
When entering the Merchant Center for the first time, you’ll be prompted to create a Project. A Project is a collection of your store configurations and Product data. How many Projects you’ll eventually create would depend on the needs of your organization, but for this initial step, let’s start with one.
Insert a Project name. This will let you and other users identify it esp. if you have multiple Projects ongoing.
The Project key is automatically generated based on the name above. Project keys serve to differentiate one Project from another.
If you want to set your own key please keep in mind: it must be unique and you can't change it at a later time.You can set the Organization that the Project belongs to. This is useful if your business has sister companies or subsidiaries. However, you may leave this as-is for the purpose of this trial.
Confirm your entries by clicking Create.
After the last step your Project will be set up in the background. Once this is finished, you are ready to evaluate all the commercetools Platform features during the trial period for your Project.
Your newly created Project contains some Project Settings for currencies, languages, and countries, but there are no Products, Categories, or Customers. If you want to evaluate the commercetools Platform using a fashion-based example Project, you can import a sample data set after creating an API Client. But if you like to try out things right away, you can do that with the Merchant Center already.
Despite the Explore the Merchant Center guide assuming you have imported example data to your Project before, you can now use it as a guided tour through the commercetools Platform features. Feel free to add your own data to evaluate the features; the Merchant Center allows you to create and change all those data via its user interface also.
Creating an API Client
To build applications with the commercetools platform and integrate other systems, you need to create an API Client in the Merchant Center. An API Client can make requests to the commercetools HTTP API.
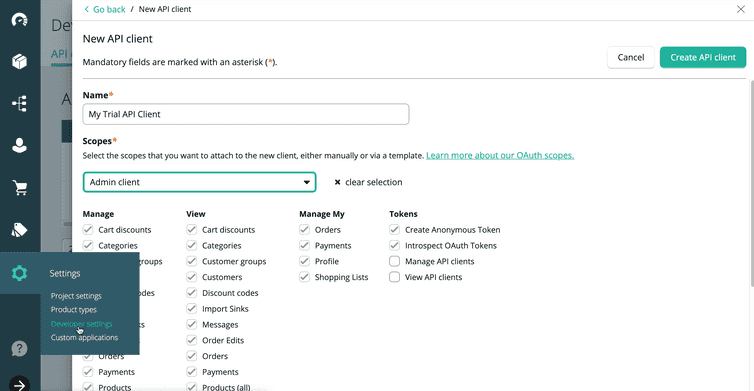
- To create a new API Client, navigate to Settings > Developer settings and click Create new API Client.
- Insert an API Client Name.
- Select the Scopes that you want to attach to the new client. For a production Project we'd want to restrict the API Client's permissions, but for testing purposes give it the Admin client permissions template.
- Click Create API client to confirm your entries.
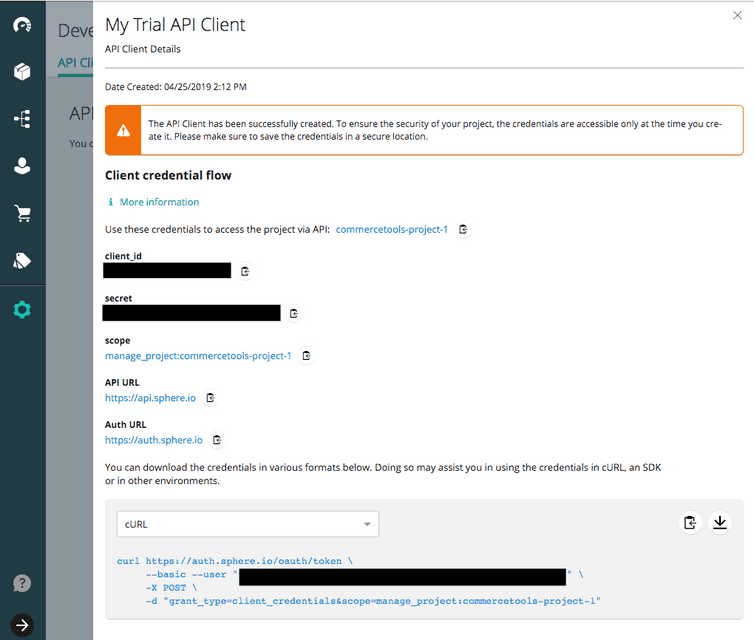
The next screen provides crucial information about the API Client. For security reasons, it is only displayed once, immediately after creating an API Client. You must save this information. Be sure to copy the content of following fields:
- project_key
- client_id
- secret
These credentials can be downloaded in several formats, depending in which SDK or tool you would like to use them further. You can choose from following options: cURL, SUNRISE, YAML, Java, JavaScript, PHP, iOS, Environment Variables, and Postman. Select one from the drop-down and click the download button.
The screenshot shows an example for the use of cURL. To use this, copy the cURL snippet into a command-line terminal and execute it to generate the API access token. For more information about access tokens, see Authorization.
Cloning and Importing Sample Data
To make it easier for you to explore what commercetools can do, we provide a sample data set that you can import to automatically populate various entities.
After creating your API Client you can import the SUNRISE Data to your commercetools Project. This provides you with Products, Customers, and other entities for learning how the commercetools Platform works.
Sending Requests to the API
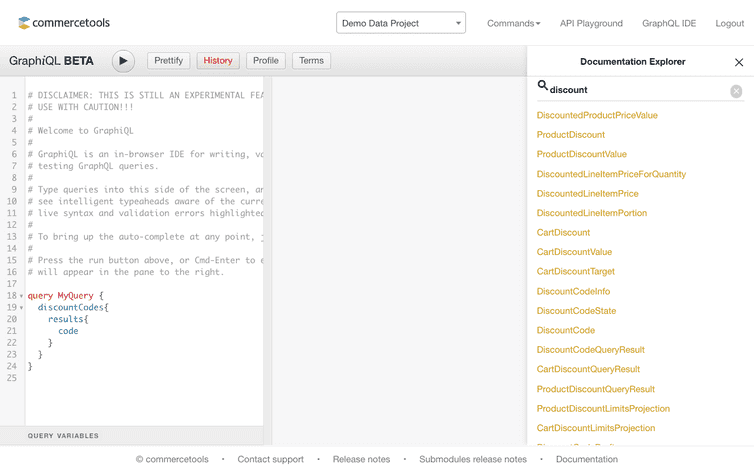
To utilize the commercetools Platform from your e-commerce application we provide SDKs in several languages, but probably the easiest way to start experimenting with the APIs is to use our API Playground that is part of ImpEx. Just login there with your Merchant Center account and ImpEx will obtain the API access token automatically so that you don't have to care about further authorization anymore. The API Playground allows you to send requests to the HTTP API endpoints; for requests to the GraphQL API use the GraphQL IDE instead. The latter provides a Documentation Explorer that you might find useful.
If you are a Postman user, please try our Postman collection which contains examples for all the API endpoints the commercetools Platform provides. This collection also contains the request for obtaining the API access tokens with the credentials of your API client. The easiest way to get these credentials into your Postman environment is to save those in Postman format when creating your API client with the Merchant Center and import that file with Postman.
Even more next steps
- Walk through the HTTP API tutorial
- Get familiar with the API documentation
- Get to know the SDKs, SUNRISE Template Frontends and Import/Export Tools
- Learn about best practices regarding performance
- Contact us through Support Portal
- Follow us on Twitter for product news and updates


